In this post, we look at adding an admin menu item for the module we created in Creating a Magento 2 Module.
The admin menu is made up of different levels, with the top-level zero being the menu bar that runs down the left-hand side of the admin, figure 1 displays an example of the different levels.
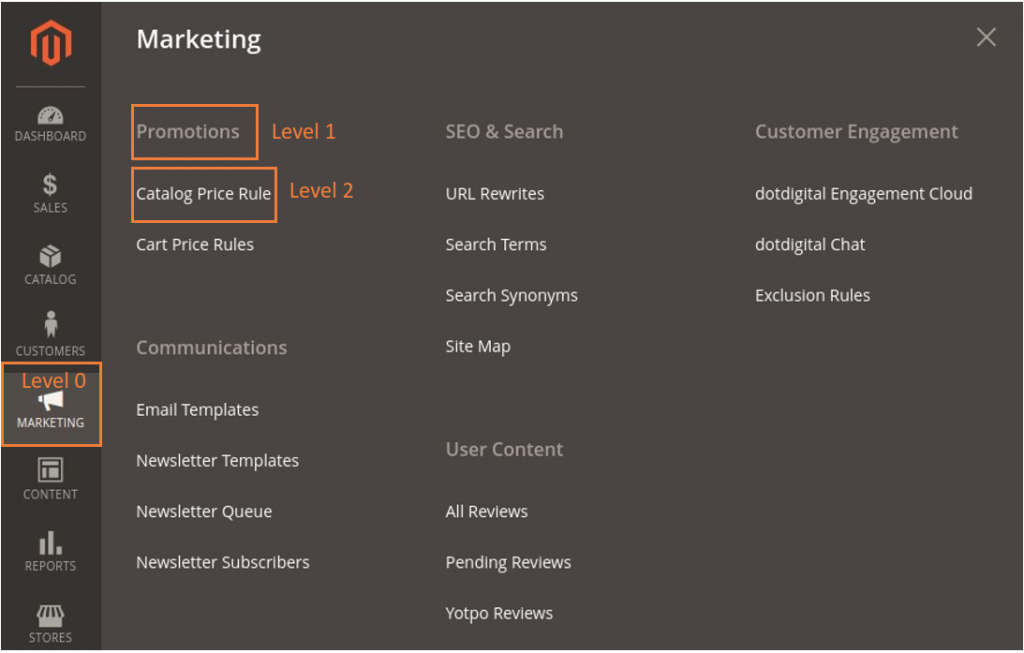
Typically we do not create new level zero menu items, too many of these, and the left-hand navigation quickly becomes cumbersome with the need to scroll up and down to view menu items. Wherever possible new menu items should be added as a sub-menu of one of the existing level zero menu items.
lets go ahead and add the required file and configuration to our module.
Menu.xml
In the following example we are going to go ahead and break the rule of adding a level zero menu item for demonstration purposes. To add menu items to an existing level zero perform a search on the Magento code base within the menu.xml files and see how core modules do it. For instance to add a menu item under the Customers tab you might add a menu item with parent="Magento_Customer::customer".
Go ahead and create the file app/code/Examples/FirstModule/etc/adminhtml/menu.xml
Now add the following content to the new menu.xml file
<?xml version="1.0"?>
<config xmlns:xsi="http://www.w3.org/2001/XMLSchema-instance"
        xsi:noNamespaceSchemaLocation="urn:magento:module:Magento_Backend:etc/menu.xsd">
    <menu>
        <!-- Top Level Menu Item -->
        <add id="Examples_FirstModule::level_zero" title="Examples" translate="title" module="Examples_FirstModule"
             sortOrder="10" resource="Examples_FirstModule::first_module"/>
        <!-- First Grouping -->
        <add id="Examples_FirstModule::level_one" title="Examples Level One" translate="title" module="Examples_FirstModule"
             parent="Examples_FirstModule::level_zero" resource="Examples_FirstModule::first_module"/>
        <add id="Examples_FirstModule::level_two" title="Posts" translate="title" module="Examples_FirstModule"
             parent="Examples_FirstModule::level_one" sortOrder="10" dependsOnModule="Examples_FirstModule"
             action="examples/examples/posts" resource="Examples_FirstModule::first_module"/>
        <!-- Second Grouping -->
        <add id="Examples_FirstModule::level_one_second" title="Examples Level One (2nd)" translate="title" module="Examples_FirstModule"
             parent="Examples_FirstModule::level_zero" resource="Examples_FirstModule::first_module"/>
        <add id="Examples_FirstModule::level_two_second" title="Posts (2nd)" translate="title" module="Examples_FirstModule"
             parent="Examples_FirstModule::level_one_second" sortOrder="10" dependsOnModule="Examples_FirstModule"
             action="examples/examples/posts" resource="Examples_FirstModule::first_module"/>
    </menu>
</config>
Notify Magento Of Change
Finally, we need to tell Magento that there has been an update, use the following CLI command to flush the cache
bin/magento c:f
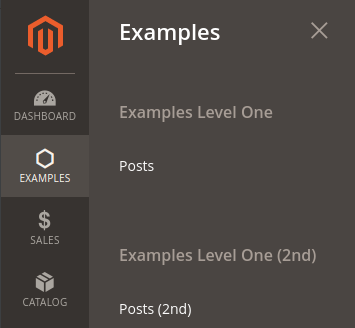
once the cache has been flushed refresh your admin view in the browser, the new menu items should be displayed as per the image below
What’s Next?
You might notice that the level two menu items declare an action action="examples/examples/posts", this is a URL anchor path for that menu item, see setting up a custom admin page for more information.