In this post, we will look at adding a basic page and template to the Magento admin system. It is recommended that you have read and completed Creating a Magento 2 Module & Adding A New Admin Menu Item before moving on to this topic.
New admin pages will typically require the following items, a custom router to tell Magento how to access the modules page, a controller to handle the action, a layout view that instructs Magento on how the page should be constructed, and either a phtml template or the elements for a UI component.
In this example, we will be using a basic phtml template to display some simple text.
Adding A Router
You can register both front-end and adminhtml routers within Magento for custom page routes. Taking from the example in Adding A New Admin Menu Item we will create an admin router to handle the path https://magento.address/admin/examples/examples/posts/
First we need to create the routes.xml file under app/code/Examples/FirstModule/etc/adminhtml/routes.xml
Once you have created the file add the following code to it:
<?xml version="1.0"?>
<config xmlns:xsi="http://www.w3.org/2001/XMLSchema-instance" xsi:noNamespaceSchemaLocation="urn:magento:framework:App/etc/routes.xsd">
    <router id="admin">
        <route id="examples" frontName="examples">
            <module name="Examples_FirstModule"/>
        </route>
    </router>
</config>
The above specifies the following the frontName attribute is the first part of the path [examples]
Add A Controller
Next, we add the controller folder and the PHP page handler file.
The controller folder will specify the second part of our URL path, in this case, Examples
Go ahead and create the directory app/code/Examples/FirstModule/Controller/Examples/
So now we have the frontName attribute from the router and the controller folder which gives us the path Examples/Examples
Now we need to add the page handler, go ahead and create the class Posts.php in the directory we just created above
app/code/Examples/FirstModule/Controller/Examples/Posts.php
Now add the following code to it:
<?php

namespace Examples\FirstModule\Controller\Adminhtml\Examples;

class Posts extends \Magento\Backend\App\Action implements \Magento\Framework\App\Action\HttpGetActionInterface
{
    /**
     * Authorization level of a basic admin session
     *
     * @see _isAllowed()
     */
    const ADMIN_RESOURCE = 'Examples_FirstModule::first_module';

    /**
     * The admin menu item
     */
    const ADMIN_MENU = 'Examples_FirstModule::level_zero';

    /**
     * @var \Magento\Framework\View\Result\PageFactory
     */
    protected $resultPageFactory;

    /**
     * Index constructor.
     *
     * @param \Magento\Backend\App\Action\Context $context
     * @param \Magento\Framework\View\Result\PageFactory $resultPageFactory
     */
    public function __construct(
        \Magento\Backend\App\Action\Context     $context,
        \Magento\Framework\View\Result\PageFactory $resultPageFactory
    ) {
        parent::__construct($context);
        $this->resultPageFactory = $resultPageFactory;
    }

    /**
     *
     * @return \Magento\Framework\View\Result\Page
     * @throws \Magento\Framework\Exception\LocalizedException
     */
    public function execute()
    {
        /** @var \Magento\Backend\Model\View\Result\Page $resultPage */
        $resultPage = $this->resultPageFactory->create();
        $resultPage->setActiveMenu(static::ADMIN_MENU);
        $resultPage->getConfig()->getTitle()->prepend(__('Examples_FirstModule Posts'));
        return $resultPage;
    }
}
We now have our router and controller structure in place.
Add Layout Instructions
Now we are going to tell Magento how this page should be displayed.
Create the following directory and file within the module:
app/code/Examples/FirstModule/view/adminhtml/layout/examples_examples_posts.xml
Notice how the filename matches our URL path examples/examples/posts, this is how Magento identifies which template file to load when processing the request.
Add the following code to the new template file:
<?xml version="1.0"?>
<page xmlns:xsi="http://www.w3.org/2001/XMLSchema-instance" xsi:noNamespaceSchemaLocation="urn:magento:framework:View/Layout/etc/page_configuration.xsd">
    <update handle="styles"/>
    <body>
        <referenceContainer name="content">
            <block class="Magento\Backend\Block\Template" template="Examples_FirstModule::posts.phtml"/>
        </referenceContainer>
    </body>
</page>
The above tells Magento that the main content div should use the standard template block class and a template file called posts.phtml, we will add the template file next.
Add Template File
The template file handles the display logic and is typically a combination of both HTML and PHP, the block defined in the template file is also injected into the template for use. However, in this example, we will just simply be displaying some text on the page. For a more complex template example see the CRUD operations post.
Now create the following directory and file
app/code/Examples/FirstModule/view/adminhtml/templates/posts.phtml
Add the following code to it:
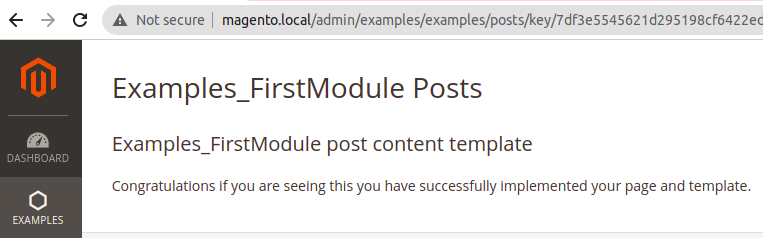
<h2>Examples_FirstModule post content template</h2>
<p>Congratulations if you are seeing this you have successfully implemented your page and template.</p>
Notify Magento
Finally with the above in place we need to notify Magento of the changes, run the following CLI command and flush the cache
bin/magento c:f
If successful you should be able to use the Examples menu to navigate to the posts page which will be rendered like the below image